
Are you ready to create your own pizza paradise in your backyard? With this DIY guide, you can build an outdoor pizza oven that will have your taste buds dancing.
From choosing the perfect location to gathering the necessary materials, we’ll walk you through each step.
Get ready to roll up your sleeves and enjoy the satisfaction of making delicious homemade pizza right in your own backyard.
Let’s get started!
Choosing the Perfect Location
Choose a location that best accommodates your outdoor pizza oven’s needs.
When selecting the perfect spot for your oven, consider factors such as accessibility, safety, and functionality.
Look for a flat surface that’s easily accessible from your kitchen or dining area. This will make it convenient for you to transport ingredients and pizzas to and from the oven.
Ensure that the location is also safe, away from any flammable materials or structures. A clear space around the oven will prevent any accidents or fires.
Additionally, think about functionality. The location should have adequate ventilation to allow smoke to disperse easily. It should also be close to a power source if you plan on using electric components.
Gathering the Necessary Materials
To begin gathering the necessary materials for your outdoor pizza oven, start by making a list of the items you’ll need. This will help ensure that you have everything you need before you begin the construction process. Here are some key items to include on your list:
- Firebricks: These bricks are designed to withstand high temperatures and will form the base and walls of your oven.
- Cement: You’ll need a high-temperature resistant cement to hold the firebricks together.
- Insulation: To ensure that your oven retains heat, you’ll need insulation material such as ceramic fiber blanket or perlite.
- Metal mesh: This will be used to reinforce the cement layer.
- Tools: Gather essential tools like a trowel, level, tape measure, and a masonry saw.
Building the Foundation
To continue the construction process, start by preparing the foundation for your outdoor pizza oven.
Begin by selecting a suitable location in your backyard or outdoor space. Clear the area of any debris or vegetation to ensure a clean and level surface.
Next, mark the dimensions of the foundation using stakes and string. Dig a hole that’s approximately 8 inches deep and wide enough to accommodate the size of your oven. Compact the soil at the bottom of the hole to create a stable base.
Then, pour a layer of gravel into the hole, spreading it evenly and compacting it firmly. This will provide proper drainage and prevent the foundation from shifting.
Constructing the Oven Base
After preparing the foundation, it’s time to move on to constructing the oven base for your outdoor pizza oven. Start by laying the first course of bricks, using mortar to secure them in place. Make sure to level each brick as you go, using a spirit level to ensure accuracy.
Once the first course is complete, continue adding additional courses until you reach the desired height for your oven. Remember to leave space for the oven entrance. As you build each course, regularly check for levelness and adjust as needed.
It’s important to take your time and make sure the base is sturdy and level, as this will provide a solid foundation for your pizza oven. Once the base is complete, you can move on to constructing the oven dome.
Creating the Insulation Layer
Once you have completed constructing the oven base, it’s important to move on to creating the insulation layer to ensure optimal heat retention and efficiency.
The insulation layer plays a crucial role in maintaining the heat inside the pizza oven, allowing it to reach and maintain high temperatures for longer periods of time.
To create this layer, you’ll need to use insulation materials such as ceramic fiber blanket or vermiculite mixed with Portland cement.
Start by applying a layer of the chosen insulation material on the inner walls of the oven, making sure to cover all surfaces evenly.
Then, proceed to cover the insulation layer with a protective layer, such as chicken wire or metal lath, to hold it in place.
This protective layer will prevent the insulation material from shifting or falling off.
Building the Oven Dome
To begin building the oven dome, you’ll need to shape and layer the refractory materials. This step is crucial to ensure the durability and efficiency of your outdoor pizza oven.
Start by creating a sturdy base using fire bricks or concrete blocks. Then, lay a layer of refractory mortar on top of the base, making sure to smooth it out evenly.
Next, begin shaping the dome by layering fire bricks in a circular pattern. Use refractory mortar to secure each brick in place, ensuring a tight fit. As you build upwards, gradually angle the bricks inward to create the dome shape.
Continue layering and angling until you reach the desired height. Remember to leave a small opening for the oven entrance.
Installing the Pizza Stone
Now, you’ll regularly need to install the pizza stone in your outdoor pizza oven to achieve the perfect crispy crust. Installing the pizza stone is a crucial step in the pizza-making process.
To begin, make sure the oven has reached the desired temperature, typically around 500 degrees Fahrenheit. Next, carefully place the pizza stone on the middle rack of the oven, ensuring it’s centered.
The stone should be preheated for at least 30 minutes before placing the pizza on it. This allows the stone to absorb and distribute heat evenly, resulting in a crispy and evenly cooked crust. Remember to handle the stone with oven mitts or heat-resistant gloves to avoid burns.
With the pizza stone properly installed, you can now enjoy delicious, restaurant-quality pizzas in your outdoor pizza oven.
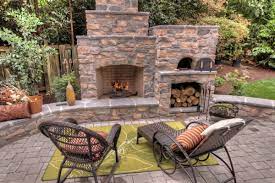
Enjoying Your Homemade Pizza Paradise
Savor every bite of your mouthwatering homemade pizza in your very own pizza paradise. Now that you’ve installed your outdoor pizza oven and mastered the art of making delicious pizzas, it’s time to sit back, relax, and enjoy the fruits of your labor.
Picture yourself in your backyard, surrounded by the warm glow of the oven and the tantalizing aroma of freshly baked pizza. Take a seat at your outdoor dining table and gather your friends and family around.
As you slice into that perfectly crisp crust and gooey cheese, relish the explosion of flavors in your mouth. Feel the satisfaction of knowing that you created this culinary masterpiece from scratch.
With each bite, you’ll be transported to pizza heaven, where every moment is filled with pure joy and deliciousness.
Frequently Asked Questions
How Long Does It Take to Build an Outdoor Pizza Oven?
It takes about 4-6 weeks to build an outdoor pizza oven. You’ll need to gather materials, plan the design, and start construction. It’s a fun project that will be worth the wait!
What Are Some Common Mistakes to Avoid When Building an Outdoor Pizza Oven?
When building an outdoor pizza oven, some common mistakes to avoid include not properly measuring and leveling the foundation, using the wrong materials, and not properly insulating the oven for heat retention.
Can an Outdoor Pizza Oven Be Used for Other Types of Cooking?
Yes, an outdoor pizza oven can be used for other types of cooking. It’s versatile and can be used to bake bread, roast vegetables, and even cook meats. Enjoy experimenting with different recipes!
How Much Does It Cost to Build an Outdoor Pizza Oven?
Building an outdoor pizza oven can cost anywhere from a few hundred dollars to a few thousand, depending on the materials and size you choose. It’s a DIY project that can be both fun and rewarding.
Are There Any Safety Precautions to Consider When Using an Outdoor Pizza Oven?
When using an outdoor pizza oven, there are safety precautions to consider. Make sure to wear heat-resistant gloves, use long-handled tools, and keep a fire extinguisher nearby in case of emergencies.
Conclusion
So there you have it, your very own homemade pizza paradise!
With the perfect location, necessary materials, and a little bit of elbow grease, you can now enjoy delicious, wood-fired pizza right in your own backyard.
The process may take some time and effort, but the end result is well worth it.
So gather your friends and family, fire up that oven, and indulge in the mouthwatering goodness of your homemade pizzas.