
Are you looking to expand your Excel skills?
In this article, we’ll show you how to add columns in Excel using simple and efficient methods.
You’ll learn how to navigate the column structure, use the insert function, and utilize shortcut keys to quickly add columns.
We’ll also share some tips and tricks to help you become more proficient in adding columns in Excel.
So, let’s dive in and enhance your Excel expertise!
Understanding the Column Structure in Excel
To understand the column structure in Excel, you’ll need to know how columns are labeled and organized.
In Excel, columns are labeled alphabetically from A to Z, then AA to ZZ, and so on. Each column has a unique letter or combination of letters as its label.
The columns are organized vertically from top to bottom, with column A being the first column on the left. As you move to the right, the column labels increase alphabetically.
This organization allows you to easily navigate and locate specific columns in your spreadsheet. Additionally, the column structure in Excel allows you to easily add or insert new columns as needed, making it a flexible and efficient tool for data management.
Exploring Different Ways to Add Columns
You can easily create additional columns in Excel by using a simple keyboard shortcut. Just select the column to the right of where you want the new column to appear, and then press the ‘Ctrl’ and ‘+’ keys simultaneously.
Excel will automatically insert a new column to the left of the selected column. This shortcut saves you time and effort compared to manually inserting columns using the ribbon or right-clicking options.
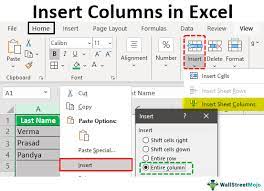
Additionally, you can also add columns by clicking on the ‘Insert’ button in the ribbon and selecting ‘Insert Sheet Columns.’ This method allows you to insert multiple columns at once or specify the exact location where you want the new columns to be inserted.
Using the Insert Function to Add Columns
By using the insert function, it’s easy to quickly add new columns to your spreadsheet.
When you want to add a column, simply click on the column letter to select the entire column.
Then, right-click and choose the ‘Insert’ option from the context menu. Alternatively, you can also use the keyboard shortcut ‘Ctrl’ and ‘+’ keys together to insert a new column.
This method allows you to add multiple columns at once by selecting multiple column letters.
Excel will shift all the existing columns to the right to accommodate the newly inserted column(s).
It’s a convenient way to organize and structure your data without having to manually move and adjust each column individually.
Utilizing Shortcut Keys for Adding Columns
Utilizing shortcut keys is an efficient way to quickly insert new columns into your spreadsheet. Instead of navigating through multiple menus, you can save time by simply pressing a few keys.
To insert a new column, first, select the column to the right of where you want the new column to appear. Then, press the ‘Ctrl’ key and the ‘+’ key together. This will instantly insert a new column to the left of your selected column.
If you want to insert multiple columns at once, select the number of columns you want to insert and then press ‘Ctrl’ + ‘Shift’ + ‘+’. This shortcut will add the desired number of columns to your spreadsheet, saving you valuable time and effort.
Adding Columns Through the Ribbon Menu
To add columns through the ribbon menu, simply click on the ‘Insert’ tab and select ‘Column’ from the options available. This will open a drop-down menu with various column-related options.
You can choose to insert a single column or multiple columns at once. Once you select the desired option, Excel will automatically insert the column(s) to the left of the selected cell or range.
If you want to insert columns to the right of the selected cell or range, you can use the ‘Insert Sheet Columns’ option instead.
Adding columns through the ribbon menu is a quick and convenient way to modify the structure of your Excel spreadsheet and organize your data effectively.
Tips and Tricks for Efficiently Adding Columns in Excel
One helpful trick for efficiently inserting new columns in Excel is to use the ‘Ctrl’ key along with the ‘+’ key on your keyboard. By doing this, you can quickly add multiple columns to your spreadsheet without the need for manual clicking and dragging.
Simply position your cursor on the column where you want the new columns to be inserted, and then press ‘Ctrl’ and ‘+’ simultaneously. Excel will automatically insert a new column to the left of your current position.
You can repeat this process as many times as needed to add multiple columns at once. This shortcut can save you valuable time and effort, especially when working with large datasets or when you need to insert columns frequently.
Conclusion
In conclusion, adding columns in Excel is a simple and essential task that can greatly enhance your spreadsheet organization and data analysis.
By understanding the column structure and exploring different methods such as using the insert function, shortcut keys, and the ribbon menu, you can efficiently add columns to your Excel worksheets.
Remember to utilize these tips and tricks to save time and increase productivity in your Excel workflow.
With these techniques, you’ll be able to easily manage and manipulate your data in Excel.